Monthly Archives: April 2013

How to Lock down the Content Database?

Environment: Project Server 2013

Why do you want to Lock down the Content Database?

As part of creating the Project Web App, Project server 2013 doesn’t ask you which Content databases need to be used. Instead, it picks up whatever content database is available so you need to temporarily lock down the Original SharePoint content database and  create a separate SharePoint content database for Project Server 2013 application as part of good practice. Once you have locked down the original content database then create a separate SharePoint WSS_Content database for Project Server 2013 application, afterword’s you are ready to create a Project Web Application Site which uses that content database.

Steps:

To lock down the content database, complete the following steps:

1. Log in to the Application server as the Farm administrator service account

2. Open the SharePoint Central Administration. Click the Manage Content Database under Application Management section.

3. Make below changes in the Database Capacity Settings section of the Manage Content Database setting dialog but before any changes make note of the Number of Sites so you can revert to original

  • Number of Sites before a warning is generated field to 1
  • Maximum number of sites that can be created in this Data field to 2

Note: Maximum number of sites should match the current number of existing created sites pointing to the content DB.

4. After step 3 you can verify your changes in the Content Database dialog.

Hope this helps!

How to Upload files to a SharePoint Document Library using PowerShell Script

# create the Variable Path and Pass the source folder path

$path = “D:\Source File\”;

# create the Variable destination and pass the URL of the SharePoint List

$destination = “http://projectserver14:99/PWA/SharePointListURL/“;

# Store the current user default credentials in the Variable Credentials

$credentials = [System.Net.CredentialCache]::DefaultCredentials;

# Create the object of the Webclient

$webclient = New-Object System.Net.WebClient;

# Pass the user credentials

$webclient.Credentials = $credentials; Get-ChildItem

# “For Each” loop will upload all of the files one by one onto the destination using the UploadFile method

Get-ChildItem $path | ForEach-Object { $webclient.UploadFile($destination + “/” + $_.Name, “PUT”, $_.FullName)};

Note: User need to have an access to the SharePoint list to upload the documents.

How to find the SharePoint Workflow History task list

Environment: Project Server 2010

By default, Workflow Tasks list is Hidden List and it is not listed under View All Site Content, however, you can manually navigate to it via,

http://[servername]/[sitename]/lists/Workflow%20History

For Instance: In below URL, snappsdev14 is the Server name and PWA is the site name.

http://snappsdev14:99/PWA/lists/Workflow%20History

st1

st2

How to Pass a Static Date in Task type Calculated Field in MS Project?

Solution:

Below are the Microsoft Project functions can be used to pass the static date value in the Task Date type formulae field.

  • ProjDateValue(“10/12/84”))
  • CDate(“10/12/84”))

Note: MS Project 2010 doesn’t accept year earlier than 1984, however, this issue has been fixed in MS Project 2013.

Hope it does helps you.

How to Insert a sequential unique integer ID value in a CSV file using PowerShell

#Import the CSV file data into Variable and add the blank new ID column

$CSV = import-csv “D:\Temp File\Temp.csv” | select Employee_ID, @{Name=”Id”;Expression={$_.””}}

# so we start from ID = 1 in the CSV file

$x=1;

# this will loop each row in CSV and insert the incremental unique ID value

FOREACH($ReadData in $CSV) {$ReadData.Id=$x;$x++}

#Export the data from the Variable to new file

$CSV| export-csv “D:\Temp File\Temp1.csv” -NoTypeInformation

How to Concatenate two column values in a CSV file Using PowerShell

#Import the CSV file in the Variable and Select the column names that you want to be displayed into #updated CSV file

$CSV = import-csv “D:\CSV File\Temp.csv” | select Surname,Given_Names,Email_Address,Employee_ID,Employee_Number,User_Name,Position_Title,

@{n=’ResourceName’;e={$_.Surname + ” ” + $_.Given_Names}}

# script @{n=’ResourceName’;e={$_.Surname + ” ” + $_.Given_Names}} will create the new #column Resource name and concatenate the Surname and Given_Names Column Value

# Export the data from the Variable $CSV to the new file

$CSV | export-CSV “D:\Temp File\Temp1.csv”

How to call the WCF Web Service in PowerShell?

# Create the WebSvcURL variable and pass the WSDL URL

$WebSvcURL= “http://snwebtt09/aurTEST/servlet/services/EV397_AURION_WS?wsdl

#Create the Web Service Proxy Object

$proxy = New-WebServiceProxy -Uri $WebSvcURL -Namespace ExportTool  -Class Program -UseDefaultCredential

$proxy

Write-host -ForegroundColor DarkBlue ===successfullyconnected to the WCF Web Service $proxy

Note: Default User account need to have an access to invoke the WCF Web Service.

Creating Hierarchical ‘Look Up’ values in a SharePoint list on a Project Site

Issue: By default, project site column doesn’t support hierarchical values in the lookup table.

Workaround: To fix the above issue, we can configure the Project Site list column look up values as per the below snapshot:

8

Solution Steps:

1. Create the custom SharePoint list. For example, we have created the SharePoint list name as “DepartmentValueList”

10

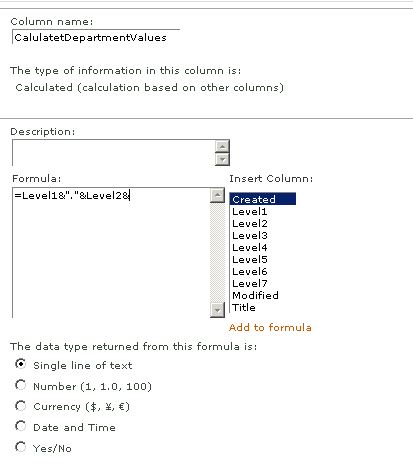
2. Create two custom columns and one calculated column to concatenate the values for two columns. In this example, to make it simple we are taking two columns but in real scenario you may need to concatenate more than two columns based on the hierarchy levels.

11

3. Define the following formulae to concatenate the values of the list columns – level one and level two

1

4. Add the dummy values in the DepartmentValue list to validate the formulae. Here, please note that you need to add the manual values with different combination for given level in the hierarchy. Refer screenshot as below:

13

“CalculatedDepartmentValues” concatenate the above two columns first row values as per below snapshot:

2

5. Now, create the Look type site column and reference the CalculatedResourceDepartment list field

3

6. The last steps is to add the site column in the project site list and save as new template.

16

15

7. In above step, we have added the Resource Department site column for the issue list. Now, click on the Issue list, you will see the site column added to the list with the Look up values. Bingo!!

5